
Frequently asked questions on Windsond
Purchasing
If you want to buy radiosonde equipment, start by sending an email to info@sparvembedded.com and ask for a quotation. You can also reach out directly viaour Contact Page. We usually reply within 24 hours. A balloon is included with each radiosonde. We also sell spare balloons.
MOQ is three sondes
Payment options are bank transfer, credit card and PayPal. In case of PayPal an additional 7% is charged. In case of credit card, an additional 4% is charged.
Windsond Operation
Typically about 2 m/s. Ascent rate can be adjusted with more or less helium.
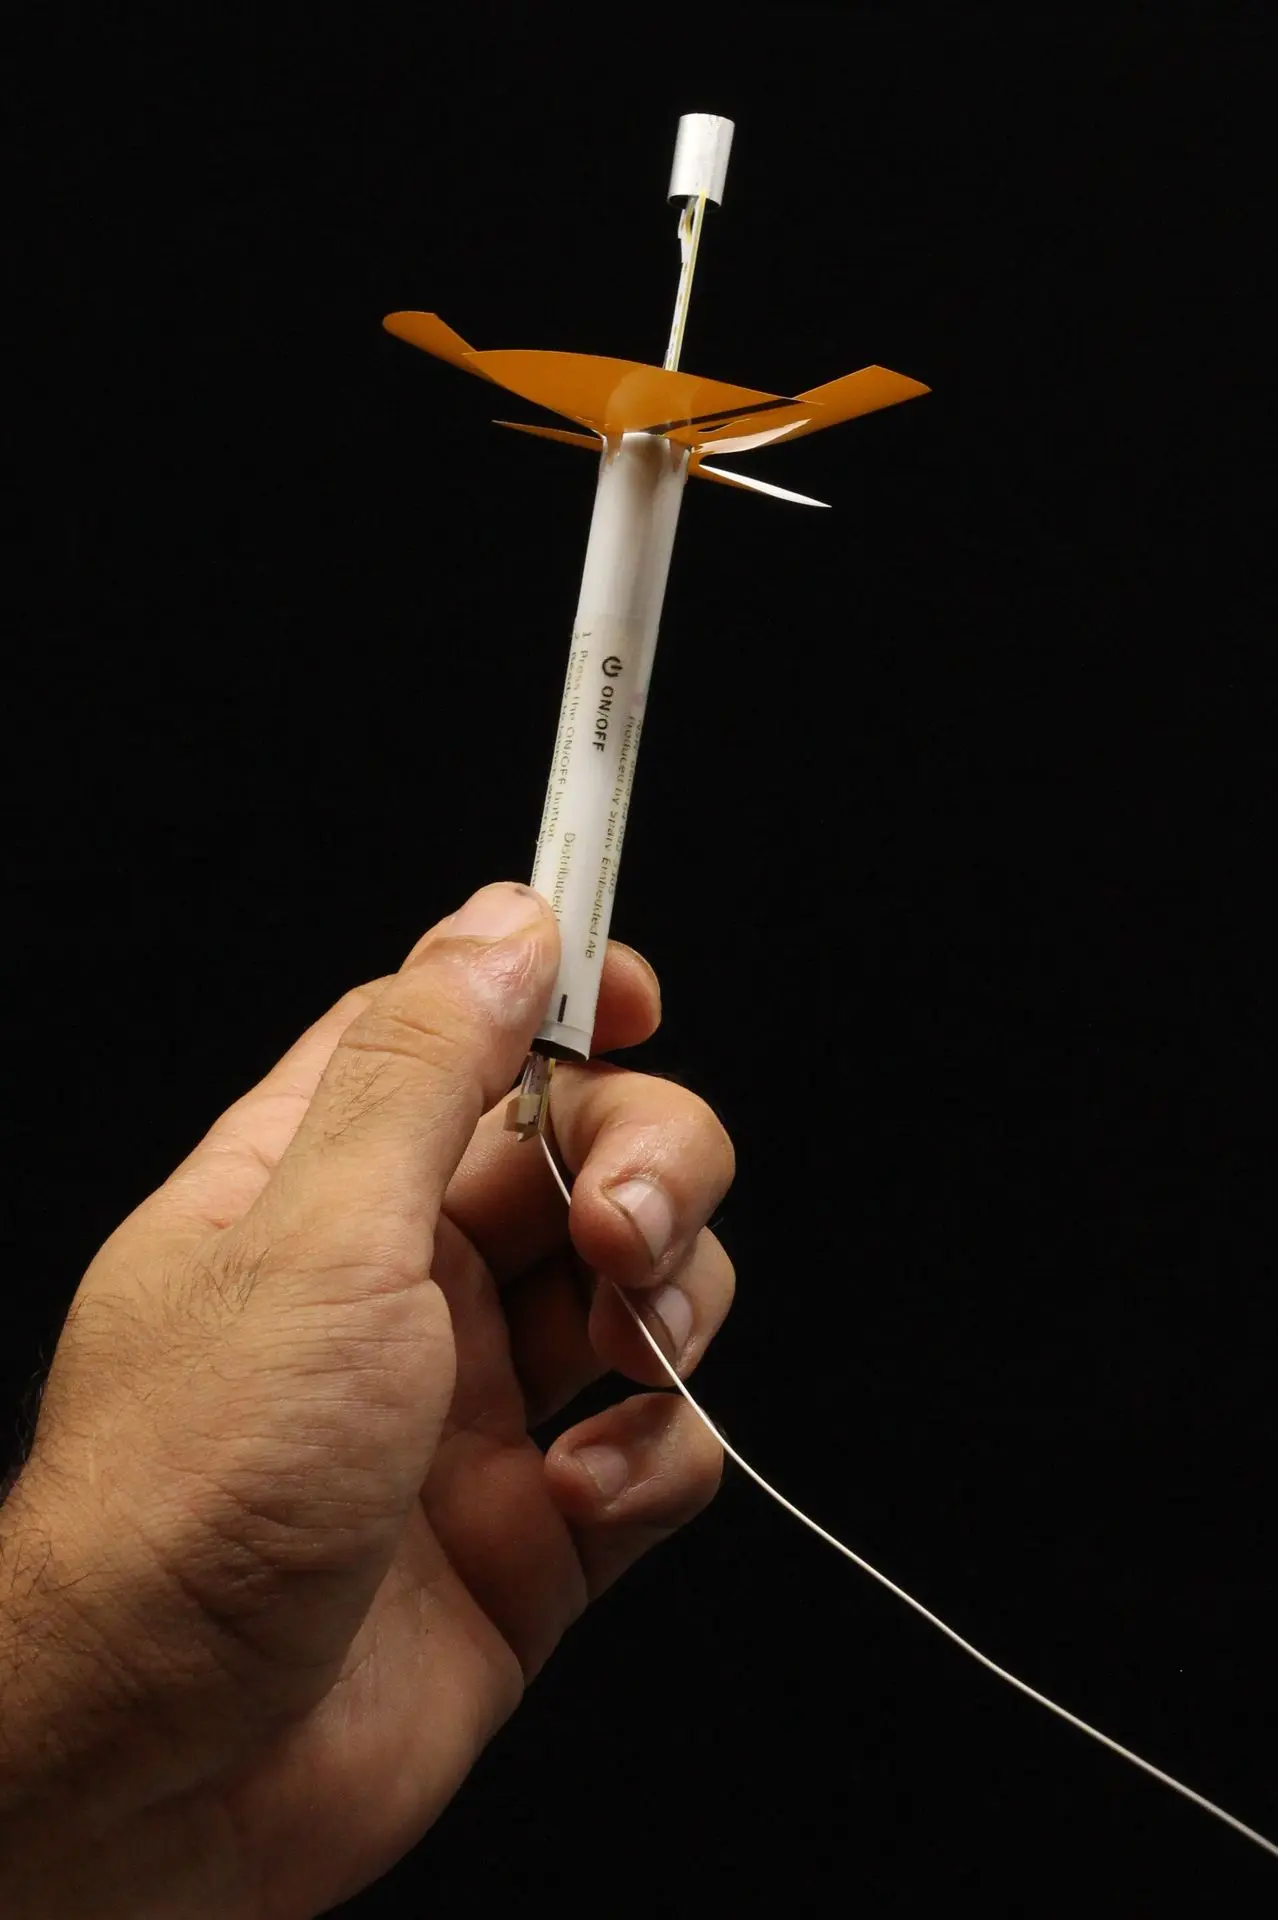
Unfasten the tape that’s holding the spool to the sonde, then unwind the spool slowly. This is to avoid having the sonde be suddenly tugged by the balloon. Especially on reusable sondes (-R), if you open the lid to the sonde, you'll see that the thread is attached to the sonde via thin heating wires. There is a chance that the heating wires will come loose if the balloon is released too hastily. The biggest risk for a forceful yank is if someone grasps the sonde when the balloon has gained speed. The sonde would then take the force of stopping the balloon. To avoid this risk, it's better to hold on to the thread close to the sonde than to the sonde itself.
As stated in the Windsond sounding guide: "Unwind the thread and let go of the balloon without causing a sudden yank of the sonde."
This is mentioned in the manual:
"For older Windows versions, the USB receiver might need a driver to be installed
before the application can use the receiver. If the hardware is not recognized
when connecting the receiver, please download a FTDI Virtual Com Port (VCP)
driver from http://www.ftdichip.com/Drivers/VCP.htm
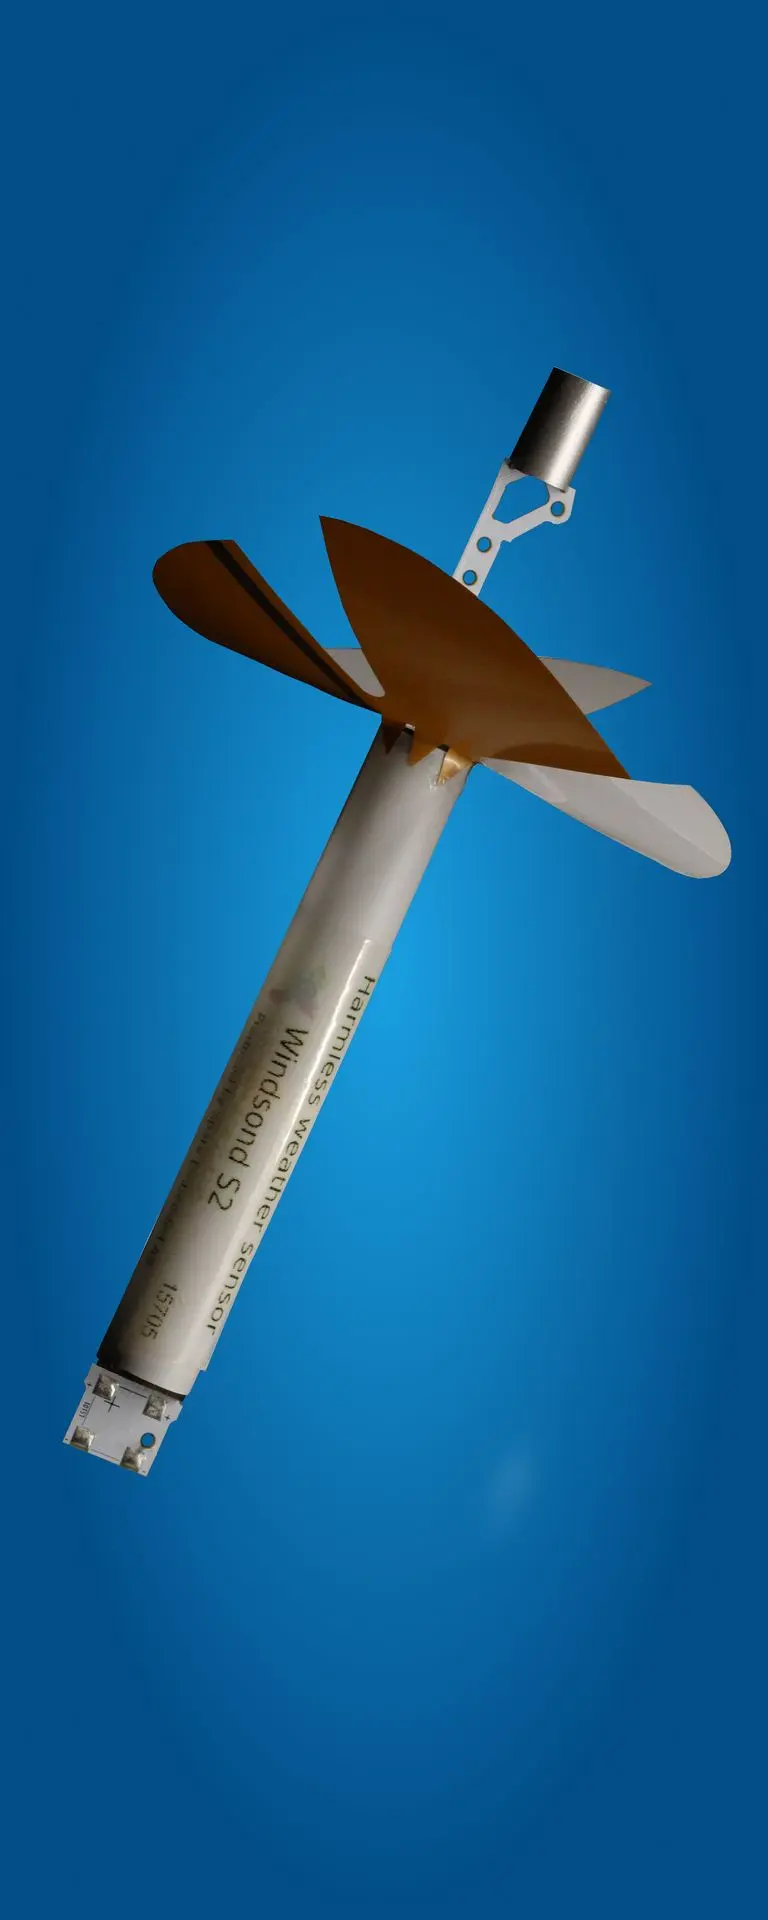
Windsonde is designed to measure up to 8 km AGL.
Shorter tether length means the sonde can swing harder under the balloon, causing more noise in the wind readings. The X axis is tether length in meters, Y is stdev in m/s and degrees, respectively:
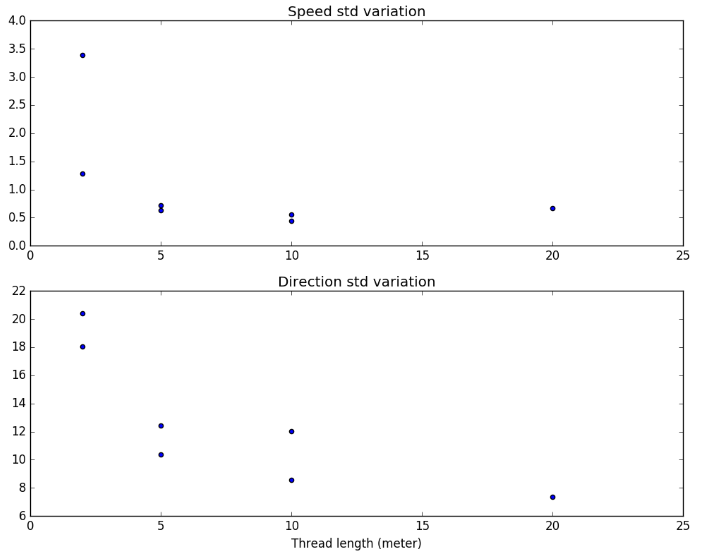
This noise is furthermore reduced a lot in post-processing. The noise is probably smaller when using two balloons but we don't have comparative data for it. We use 2 meter thread for swarmsondes for easier handling, otherwise 5 meter.
You can ask for a specific tether length when you order, or even change the lengths yourself.
You can change the frequency in the receiver window (the main application window). Enter a new frequency and press enter.
Afterwards, tell the sondes to use the new settings by starting the sondes (one or several at a time), wait a few seconds and press "Pair with sond" in the app. The sondes that didn't yet get contact with a receiver will then switch to the new settings. It might require a few button presses before the sondes hear the call.
This is the method for separating different systems. Other users have different system IDs so you won't pick up their signal by mistake, but changing the frequency also helps to avoid radio congestion.
After disconnecting from the balloon, the sonde falls at 7-8 meters per second.
Sampling rate is 1 Hz (one time per second). The sampling rate can be adjusted but 1 Hz is the fastest.
Response time is about 6 seconds for T and RH. (We are working on an optional add-on that gives 0.3 seconds response time)
If anyone is operating Windsond at the same event as you, you can change the frequency 0.5 MHz up or down and note how the reception changes. Note any change in range in different locations or at different times. A comm radio can also help to identify any conflicting transmissions. Other competitors will not get information from your sonde even if they are using the same frequency as you.
The S1 radiosonde does not support logging. S2 supports logging as an extra option.
On the ground the two systems will not have radio contact with each other and will do separate "handshaking". However, once the sondes ascend the two systems would hear each other and be confused. You should set different frequencies 0.5 or 1 MHz apart.
No issues since the sensor is outside the cup. There is a solar radiation heating effect but we employ a correction algorithm to offset that.
The low temperature and pressure at this altitude places higher requirements on the sensor elements, insulation and battery. Calibration and post-processing of the sensor readings also becomes more demanding. The balloon will also drift further, making recovery uneconomical.
For entanglement, the launch shouldn't be a problem. The balloon needs enough buoyancy to clear obstacles before the wind moves it too far horizontally. One or two practice launches should give a feeling for the factors involved.
No problem, the Windsond receiver doesn't need to be stationary. The given distance and angle from launch will no longer coincide with the current distance to the ground station, of course
Nylon thread probably works, but it's safest to use a thin thread, and test the cutdown on the ground first. The cutting performance will be worse with lower battery voltage and low temperature, so also a ground test may not be a safe indication of whether it will work in reality.
Snow and moisture in general attenuate radio signals, so yes the GPS signal can unfortunately suffer especially in heavy snowfall. My only advice is to give the sonde extra time for GPS acquisition and as always to give the sonde an unobstructed view of the sky.
Radio
If you are having issues with the Windsond radio range, please read the Windsond radio range trouble shooting document.
We would recommend within 10 km. The condition of the radio reception can vary a lot. The radio has worked even at 50-100 km distance but radio disturbances and loss of line of sight (such as high buildings, trees etc) can cut the range drastically
We usually use the radiosonde band 403 MHz or the ISM band 433 MHz but we can set the radio frequency anywhere in the range 400 - 450 MHz to fit your license. The power output is configurable up to 100 mW. Depending on the transmission distances in your case, it could be possible to get enough range with lower power.
Magnetic receiver antenna ... 3 dBi
Whip receiver antenna ... 2 dBi
Radiosonde antenna ... 2 dBi.
The radio has worked even at 50-100 km distance. However, the condition of the radio frequency band chosen can vary a lot.
- Use the magnetic car roof antenna and mount it in the middle of a car roof for best reception
- Make sure there is free line-of-sight between the sonde and receiver antenna. Avoid buildings, trees, etc.
- Select another frequency (in the receiver window, then press "pair with sonde")
- Use a bigger balloon and/or more helium to get a higher ascent speed and less horizontal drift
- The magnetic antenna can be replaced by a directional yagi antenna can be used. However, it must point in the general direction of the sonde at all times.
- Though not necessary for normal operation, it is possible to drive towards the sonde while it’s in flight, with the receiver antenna on the roof.
For more information about radio range, see the Windsond radio range trouble shooting document.
Transmission range with a directional receiver antenna is >60km
For antenna, you want a "half-dome" omnidirectional antenna. More specifically, a quarter wave ground plane antenna should be the best.
The total height will be less than 40 cm -- bigger will be worse, not better.
https://m0ukd.com/calculators/quarter-wave-ground-plane-antenna-calculator/
Unfortunately we haven't found any such ready-made antenna for the 403 MHz band.
Lacking that, the current magnetic antenna will work but should be placed on a metal surface. (The signal will bounce off the surface to improve the reception somewhat.)
A long yagi antenna:
https://www.newark.com/lprs/yagi-434a/antenna-yagi-7-element-434mhz/dp/91T5152
Another link for the same antenna:
https://se.farnell.com/lprs/yagi-434a/antenna-yagi-7-element-434mhz/dp/2096215?ost=yagi+434&cfm=true
Shorter antenna (with wider beam width and less “signal boost”):
https://moonrakeronline.com/eu/zl7-70-70cm-7-element-special-yagi-antenna
The range of the Sparv receiver in terms of bluetooth is approximately 10 meters uninterrupted. And if you meant reception from the sensor/drones then it is up to 50 km
The RR2 can be powered either by the internal battery or by connecting a USB cable. To charge the battery, connect the USB cable until the charging indicator indicates that the battery is fully charged. A fully charged battery will last for about 7 hours.
RR2 is more flexible to use as it can connect to the PC via Bluetooth. It is also weather-proof. The software of RR2 can be upgraded and we will add data collection directly to RR2 with such an upgrade.
The differences between RR1 and RR2 are further detailed in the RR2 flyer.
The RR1 receiver receives data equally well as RR2, though.
Yes, but watch out that any connectors used are equally weather-proof
The range of possible frequencies is 400-450 MHz, to support different regions. Most often, the actual range is 400-403 MHz as that is the common radiosonde frequency band. The used frequency is chosen within this range, with a bandwidth of 100 kHz. The maximum power is 0.1 W although this can be attenuated in software.
Reuse Windsond
The option for reusable Windsond is the suffix "-R". (Nonreusable is "-S"). The reusable sondes have integrated cut-down feature, loudspeaker and strobe light.
The cut-down feature enables the user to choose at what altitude the sonde should be released from the balloon. For low-altitude launches, the software will predict the landing location of the sonde as it ascends, within 50-100 meters. That way the user can "choose" the landing location as the user can decide the cut-down altitude during the flight. When the sonde reaches the configured altitude, it will automatically sever the thread to the balloon. The balloon is lost, but the sonde falls to the ground in a controlled and safe manner. Radio reception will be lost when the sonde hits the ground. The sondes built in GPS will tell the user where the sonde is within ca 50 m. As the user gets closer to the sonde, radio reception turns back on and the sonde will start to blink and beep for easier recovery.

After recovery, the user only needs to recharge the battery and attach a new piece of tether line. We estimate that low-altitude launches have a recovery rate of 90%, and that each sonde can be used about 10 times before being worn out.
Higher altitude and stronger winds means the user has to travel a longer distance for recovery or arrange for someone else to recover the sonde. This means there's a practical limit to recovery. Here are some examples of distances from launch to landing: 2 km altitude, 5 m/s mean winds, rise speed 2 m/s: 6.3 km distance 5 km altitude, 8 m/s mean winds, rise speed 5 m/s: 13 km distance 10 km altitude, 12 m/s mean winds, rise speed 5 m/s: 40 km distance
For landing, the software lets the user aim for a landing spot if using the reusable sonde variant. The accuracy is on the scale of 50-100 m radius so if you have parks or open fields downwind, you have a good chance for easy recovery. In an urban environment, rooftops and trafficked roads would definitely be a risk. Treetops pose a smaller but non-zero risk. Landing among houses could also attenuate the radio signal that helps recovery. Also, by-passers might pick it up, although a written sticker on the sonde might turn this into an advantage.
The flight distance of the sonde depends on peak measurement altitude (controllable), rise speed (controllable) and wind speed (not controllable, naturally). With light winds around 5 m/s and balloon leisurely inflated to 1.5 m/s rise speed, measuring the full boundary layer to 2000 m altitude would yield a landing spot 8 km away. A bigger balloon with more helium to reach 5 m/s rise rate would instead place the landing 3.4 km away.
Yes it works with one heat loop. There's a bit of risk that yanking on the thread may break it, though.
With two loops the force is shared. Just be careful and it will work fine.
You can also test it on the ground, via a button in the software. Suspend the sonde by a thread when
doing this, naturally
Before launch, check the software tab with the heater wires. Windsond automatically diagnoses if the wires are working a few seconds after start.
If in doubt, you can also press "cut-down now" when the sond is on the ground, to check that it detaches.
Cutdown may fail if the battery voltage is very low. Another thing to consider is to avoiding the thread from getting stuck in the lid. If the thread doesn't run free, it can of course not detach.
An estimate is 90% recovery rate in good weather. We don't have much data to go by for recovery around thunderstorms. Turbulence or very local wind conditions could throw the sonde off course and make it land in some unplanned location and recovery would then depend on access to that location.
The number of uses is limited by general wear and occasional inaccessible landings in trees or roofs.
I don't see any risk with using a ribbon (hot air balloonists call them "streamers"). A few notes: The streamer can change the fall speed. If not adjusted in the software settings, the landing prediction will be off.
The streamer of course adds a bit of weight which takes some extra helium.
For the ultimate in assisting recovery, instead attach a second small, red helium balloon. It will hover above the sonde once landed! But it can tangle high up in a tree on descent so not recommended if the landing area is forested.
In the software, you can choose if the sonde should blink and beep after it lands.
Choice Beacon at once: The sonde will beep and blink as soon as it lands.
Choice Power-save: The sonde will stay silent after landing until it receives the wakeup call from the ground station -- which it only does when the ground station is turned on and within 100-200 meters. In other words, when you go to recover the sonde.
Multiple simultaneous soundings per receiver
The standard Windsond system can operate 8 sondes at a time. With the Multisonde adaptation, the user can operate up to 126 sondes at a time.
For your use case of launching a second set of up to 8 sondes sometime after the first 8, there are a few instructions to make sure the software doesn't confuse the two sets:
As a one-time preparation, activate the multisonde sonde view of the software in File -> Settings.
Launch the first set of sondes.
Before launching the second set:
Switch radio frequency for the receiver to make sure it won't receive any data from the first set of sondes.
Close all windows for the sondes in the first set. These soundings are now considered terminated (any further received data from these sondes might confuse the software).
Make sure the list of active sondes in the main Windsond window is empty. If not, click "close" for each line.
Now the software is ready to accept a new set of 8 sondes.
Normally these steps are not necessary to detail as people usually don't launch more than 8 sondes in the same day.
If you wish to use two receivers to receive the data from the same sondes in parallel, you need separate programs -- it's easiest just to use two computers. The software for the second receiver needs a setting: Deselect "Main receiver" in the settings dialog of this software installation
The standard system can track up to 8 sondes simultaneously. No, there is no degradation in data transmission from the individual radiosondes as it's a digital signal. Multiple simultaneous soundings has no effect on transmission quality.
Software
The dots show raw values as reported from the sonde. It is normal with deviations from sample to sample. Solid lines are interpolated values, which are more accurate than individual samples.
In the Windsond software, load the sounding. In the main window, choose File menu, "Google Earth live view". Google Earth will now open. On the left side, look for the sounding data series
The ground software needs two reference values for altitude conversions; ground elevation and pressure at ground. These are used to internally calculate the pressure at sea level and conversions between all pressure levels and altitudes, using the hydrostatic equation. To support multiple ground stations for the same sonde, the values are communicated with the sonde itself.
The values can be specified manually for all sondes (in the main receiver window) or for individual sondes (in the "sonde status" tab of the respective sonde window). If not specified manually, the first pressure reading and first GPS fix altitude of each sonde will be used and filled in automatically. The values can still be corrected by the user at any time before, during or after the flight, causing all historic altitude conversions to be recalculated.
Once the values are known, the altitude of all earlier data in the series can be calculated thanks to the pressure readings.
The automatically set ground elevation can be off by quite a bit, due to the difficulty of small GPS receivers to get an accurate altitude reading. For most accurate altitude calculations, it is recommended to get an independent figure for the ground elevation. (Digital Elevation Models "DEM" can do this, for example as offered for free in Google Earth.)
You can install the software and copy the license file (windsondlic_*.dat) to several computers, as long as it's used with your own Windsond system.
The Windows application can be configured to create suitably short text tables of the winds. This text is both accessible as a file and in the Windsond application. One idea is to copy the text to some third-party application that can send text messages to mobile phones, which you can set up to send the data to your pilots. If the laptop lacks 3G and internet connection, you can use "tethering" with a smartphone to use that to send the messages
To get raw CSV data, you need to enable generating this data. This is in File -> Settings, in the list of different file formats. (You can also add your own output formats here by copying the 'template' file. See instructions in the template file itself.)
Files are normally generated as the sounding progresses. To generate files after completing a sounding, enable the "Generate output files in replay" setting, then load your .sounding file.
1) Make sure the sonde (ID XXXX) in question is turned on and no other radiosonde is turned on
2) In the receiver window, in the field to the left of text "Execute command", enter exactly:
!.exe=mac=!XXXX
And press Enter.
The sonde window should pop up in a few seconds. If not, press enter again (or press "Execute command").
Once successful, the setting is saved and you won't need to do it again
Windsond can generate different types of text (ASCII) based file formats. You can create new file formats and generate the files also after the sounding, by enabling this option in the Settings and then opening the .sounding file again.
To access a demo file in the Windsond progream, press File -> Open -> Windsond files and open demo_2015-04-16_0656.
Yes you can simulate Windsond. In Settings, activate "generate files in replay". Then open a windsond file and use the small control panel to replay it from the start.
Yes, there are many options; see the Settings dialog. There you can also enable "generate files in replay" to create files from already completed .sounding files.
You can't create a .sounding file, but you can create all other supported file formats from a .sounding file. Go to File, Settings and enable "Generate output files in replay". Also enable the file formats you want to generate. Then when you open the .sounding file, those files will be created.
WS-250 can export KML files which are used by Google Earth to display a 3D view of the flights. This view is also updated during the flights
Regarding the Ozi target, a Windsond user has made a Youtube video about this: https://www.youtube.com/watch?v=p31YqfDGHj0
Windsond compared to traditional radiosondes
Yes, Windsond is the smallest radiosonde on the market. It only weighs 12 grams and only requires a small balloon and very little helium to launch. The radio receivers are also small and connect easily to a computer, making operations on the ground very portable.
Windsond is customized for low altitudes. Since the weight is lower, it is enough with a small weather balloon and a small amount of helium. The system is also much more portable than regular radiosondes. On the other hand, it currently does not measure above 8 km AGL. Windsond is a relatively new system and is less expensive than established systems, especially when the sondes are reused. However, it has not participated in WMO intercomparisons yet
Windsond has not participated in the WMO radiosonde intercomparisons. The goals of Windsond are to facilitate a large number of low-altitude soundings, rather than the more expensive high-altitude soundings where accuracy has been analysed for many years. If absolute accuracy is more important than price, other systems are more suitable.
Balloon and battery
Drain time on our batteries is about 2-4 hours in active mode depending on configuration and a couple of days draining time in sleeping mode.
BL140 lasts about 80% longer than BL75. It requires marginally more helium to lift.
Standard party balloons are slightly too small and give a poor rise speed. Large party balloons work fine, though. They need to hold some 30 liters of helium. (Counter-intuitively, consumer bottles labeled "balloon helium" are of low purity and somewhat less efficient.)
Ascent rate is commonly 2 m/s, but we can include larger balloons if you prefer a higher rate. Data is transmitted in real-time also on descent. The sonde falls at about 8 m/s so the T and RH response time of 6 sec makes the data lag behind. Winds are measured approximately correct.
If hydrogen mixes with air it is combustible. The reusable sondes have a hot wire for cutting down the balloon. The hot wire can get glowing hot when actuated. The hot wire is normally tested before every launch by sending a quick pulse. The pulse is so short that the wire "shouldn't" heat up, but this is not formally guaranteed. There is also an option in the software to disable this test.
For single-use sondes, we don't see any risks.
Still, Sparv doesn't take responsibility for accidents with hydrogen. Please take care
Party balloon helium is diluted with air and so is more dense and less efficient. If you know the mixture of your particular gas, you can easily estimate how much more gas you need to use. We have used party helium ourselves and it does work. A rough guess; maybe 10-20% more gas?
Latex balloons can be used for many years if properly stored. It is recommended to use latex balloons within two years after manufactured, as they will get brittle and pop the more years go by unused. Always store balloons in a cool, dry, and well-ventilated area. Optimum storage temperature is 20 to 22 degrees celsius. Keep balloons away from any heat sources, such as motors and hot water pipes. Do not store balloons in a vehicle or garage where temperatures fluctuate. Balloons should be kept away from direct light sources, such as sunlight, incandescent lights, and fluorescent lights.
(https://support.bargainballoons.com/support/solutions/articles/27000057425-what-is-the-shelf-li fe-of-latex-balloons-) sunlight, incandescent lights, and fluorescent lights.
(https://support.bargainballoons.com/support/solutions/articles/27000057425-what-is-the-shelf-li fe-of-latex-balloons-)
We don't have data for this, but we don't suspect the balloon size to have any influence on wind readings. The only force resisting the balloon from adapting the exact speed of the surrounding air is the inertia from balloon and sonde, and that is only relevant in case of wind shear. I vaguely recall a test yielding a timescale of one second for this. The difference in cross section area between balloon sizes could change the wind force by perhaps a factor of 2. That can hardly make a measurable difference in wind readings, considering that winds are averaged over tens of meters to increase the resolution.
The balloon size will affect the rise speed, which directly correlates to the vertical resolution of the measurements. This might make a measurable difference in stratified atmospheric conditions.
Other
We have an experimental S2 radiosonde firmware and software for dropsonde use. Contact us to learn the latest.
For use on a drone, this has been done a number of times. In the software settings, deselect "Enable sondes sounding cycle" before starting the sonde. Don't forget to select this again before launching as weather balloon.
When using Windsond as a tethersonde, you should go to settings in the Windsond program and disable the sounding cycle. Just remember to enable the sounding cycle when you are going to do a normal launch.
A tethered balloon will be pulled towards the ground by the wind.
An aerostat is instead designed to counteract this. See https://www.helikites.com/
Windows tablets can run the Windsond software and communicate with RR2.
We use this formula:
"Temperature in C, relative humidity in percent (0-100)"
# Uses Magnus approximation
# From http://en.wikipedia.org/wiki/Dew_point#Calculating_the_dew_point
#and http://www.calcunation.com/calculators/nature/dew-point.php
b = 17.62
c = 243.12
gamma = math.log(rh / 100.0, math.e) + b * temp / (c + temp)
return c * gamma / (b - gamma)
Permissions vary a lot between countries and we don’t know of individual countries’ regulations. In practice, the miniscule size and weight is harmless to aviation, comparable with the smallest birds.
Some countries recognize this and some do not.
Yes, a tracking device. This is a built-in function in Windsond.
Recalibration is not required and the error characteristics don't change unless the sensor is contaminated after landing (NCAS in UK investigated this). Contamination is rare but for reassurance you could compare the readings to another sonde. It's also possible to replace the sensor boom and we can sell you spare ones if you like.
The full list of customer references, media and articles:
A lightweight laptop is the easiest to bring. And a long-lasting battery. Non-reflective screens are easier to read outdoors. You need at least one USB A port, pretty much standard. Some people use Windows tablets but we don't have experience of that ourselves.
Internet connection helps a lot to download maps to recover the sondes. You can connect the laptop to your smartphone's internet, or splurge for a laptop with a built-in cellular modem.